

MELBOURNE
CHENNAI
Table of Contents
| Table of Contents |
|---|
Introduction
This document refers to the steps on how to configure Loree on Canvas LMS. For configuring Loree, you must be logged in as an Account Admin in your Canvas account.
Developer Key Generation using LTI Key
Step 1: Log in to Canvas as an Account Admin on root account
Step 2: Open the Admin menu from Account Navigation and select the Account name
Step 3: Select Developer Keys in the sidebar
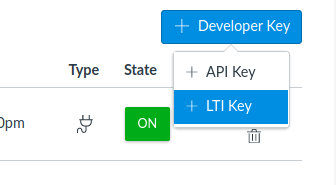
Step 4: Click the + Developer key button and choose LTI Key
Step 5: You will be navigating to the below screen where you have to fill in the details as mentioned below
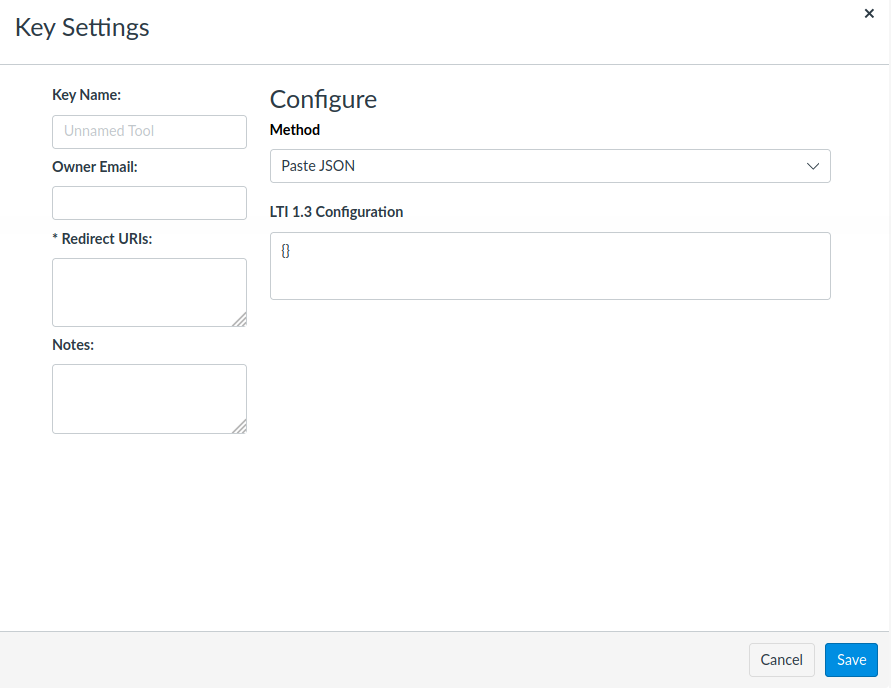
Key Name: Loree
Owner Email: support@loree.io
Redirect URIs: https://loreev2.crystaldelta.net/lti/auth
Configure Method: Paste JSON
Copy the below JSON values and paste them in on LTI 1.3 Configuration field
| Code Block |
|---|
{
    "title": "Loree",
    "scopes": [],
    "extensions": [
        {
            "platform": "canvas.instructure.com",
            "settings": {
                "platform": "canvas.instructure.com",
                "placements": [
                    {
                        "placement": "course_navigation",
                        "message_type": "LtiResourceLinkRequest"
                    }
                ]
            },
            "privacy_level": "public"
        }
    ],
    "public_jwk": {},
    "description": "Production environment ",
    "custom_fields": {
        "roles": "$Canvas.membership.roles",
        "user_id": "$Canvas.user.id",
        "course_id": "$Canvas.course.id",
        "is_root_account_admin": "$Canvas.user.isRootAccountAdmin"
    },
    "public_jwk_url": "https://canvas.instructure.com/api/lti/security/jwks",
    "target_link_uri": "https://loreev2.crystaldelta.net/lti/auth",
    "oidc_initiation_url": "https://loreev2.crystaldelta.net/lti/launch"
} |
Save the Key Settings after filling in the details. (Make sure the JSON format should be valid).
Step 6: Turn ON the developer key status

Step 7: Please note/copy the client ID for future reference.
Developer Key Generation using API Key
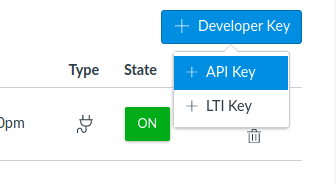
Step 8: Repeat steps 1, 2, and 3. To create an API key click the + Developer key button and choose API Key to access Canvas API’s from Loree.
Step 9: You will be navigating to the below screen where you have to fill the details as mentioned below
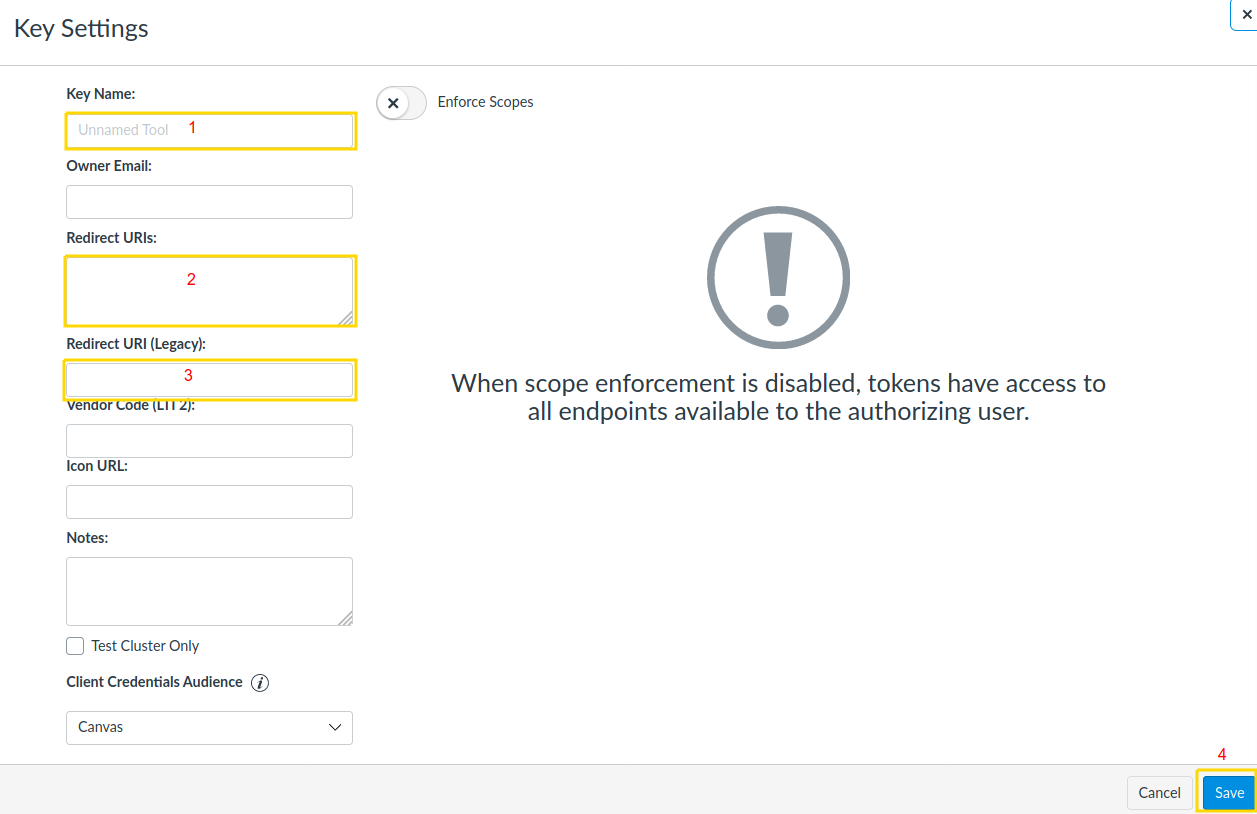
Key Name: Loree-api
Owner Email: support@loree.io
Redirect URIs: https://loreev2.crystaldelta.net/lti/token
Redirect URI (Legacy): https://loreev2.crystaldelta.net/lti/token
Click on “Save“ to create new Developer key
Step 10: Turn ON the new developer key status

Step 11: Please note/copy the client ID and secret key for future reference
Install Loree LTI app in Canvas
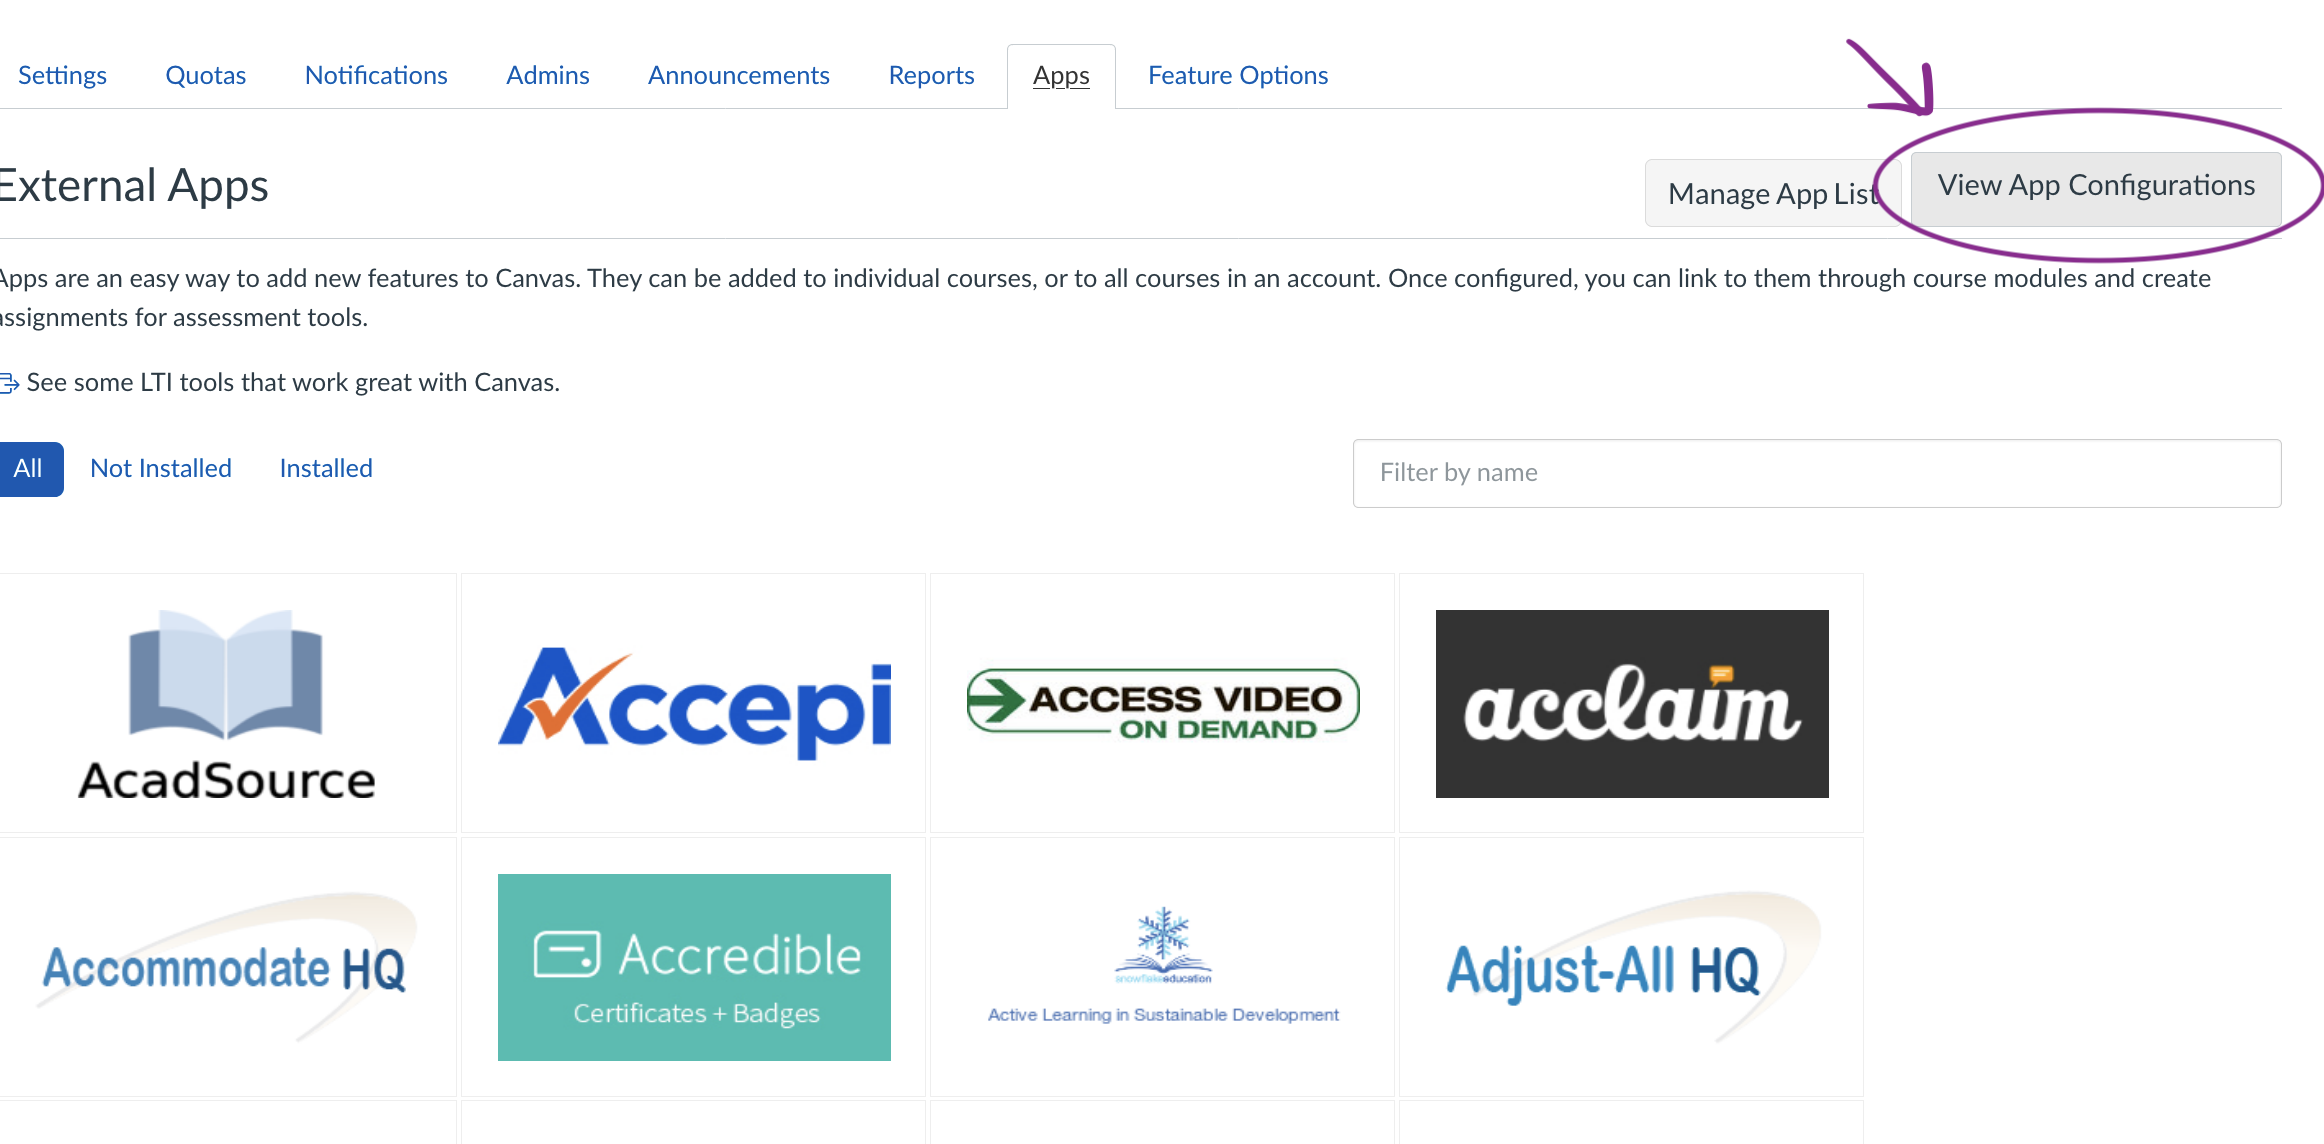
Step 12: After successful creation of LTI and API developer keys, an account admin should navigate to Admin menu → Settings → Apps → View App Configurations for creating Loree LTI app.
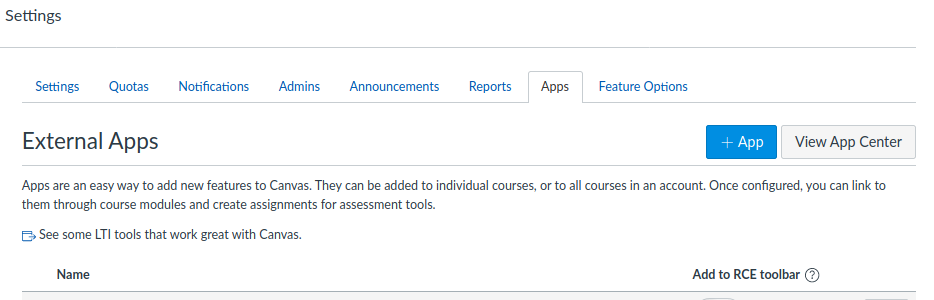
Step 13: Click on the +App button to create a new application
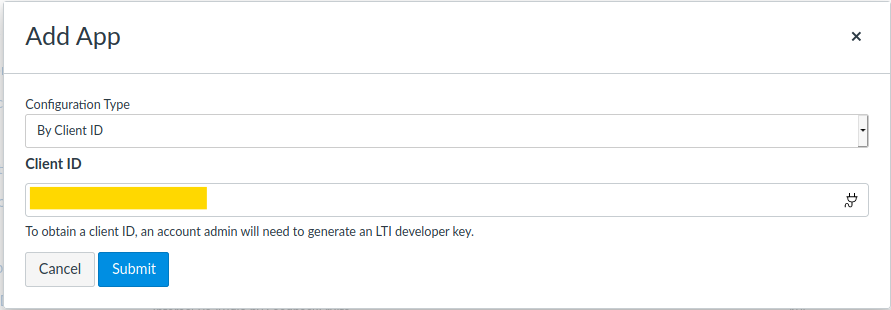
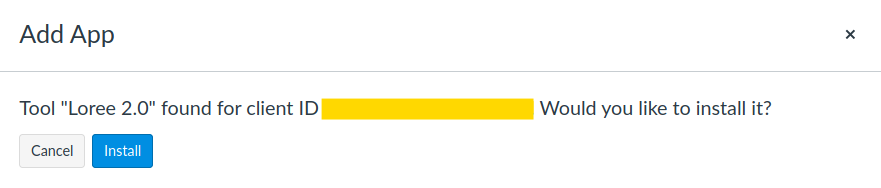
Step 14: In the dialog that appears, choose By Client ID as the Configuration type
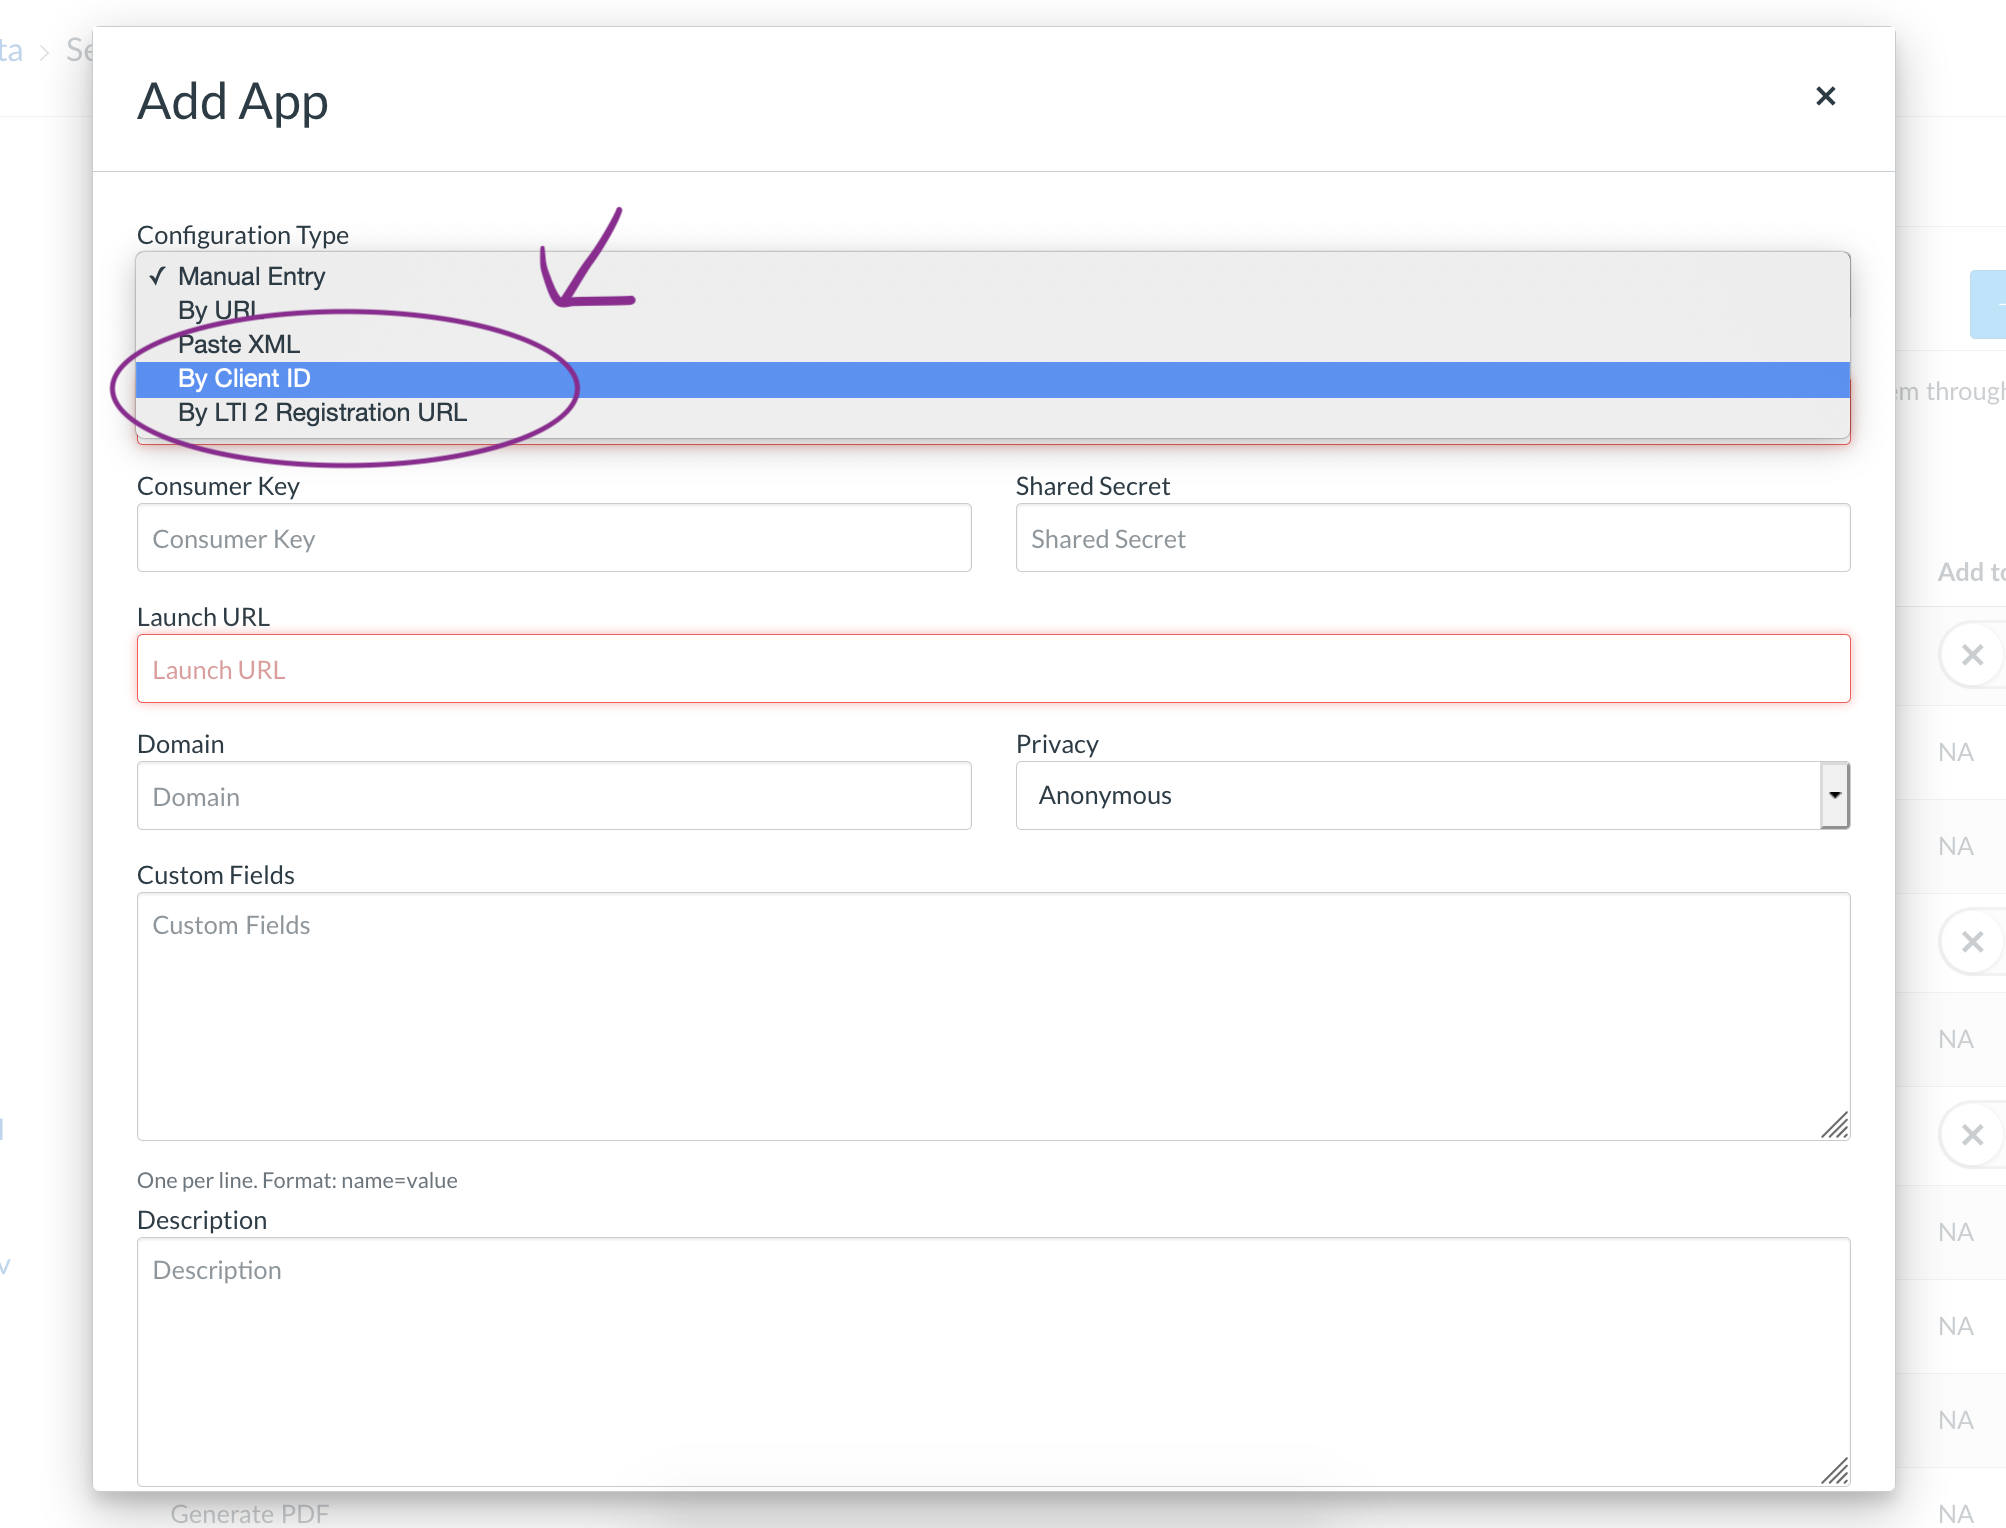
Step 15:Paste the copied client ID from the LTI key generation and paste it into the client ID field. Press the Submit button. (refer step-1 to step-7 for LTI key generation)
Step 16: In the dialog that appears, click install
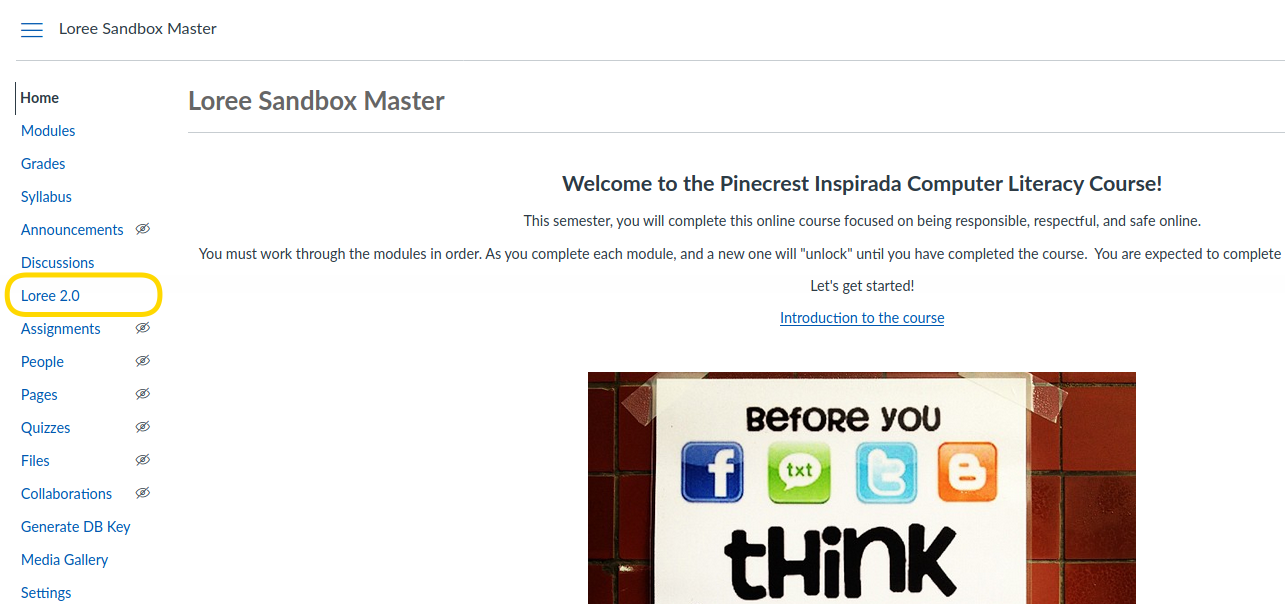
Step 17: Make sure Loree is available on the External Tools list.
Adding Canvas as Tool Consumer in Loree
Step 18: You are at the final step of configuration. This process has to be done by the Loree super Admin at the back-end. Only you have to do is, to share the below values.
Canvas instructure URL (Example: https://crystaldelta.instructure.com)
LTI client ID
API client ID
API client Secret (click on Show Key to get the secret)
Note: You can share the details via Email or any mode of a secure connection
(Note: This configuration process may take several minutes. )
Launch Loree LTI tool from the course navigation
Step 19: Once the Loree-team sets up the configuration you will be notified. Now, you are ready to launch the Loree tool from course navigation. Cheers!!!
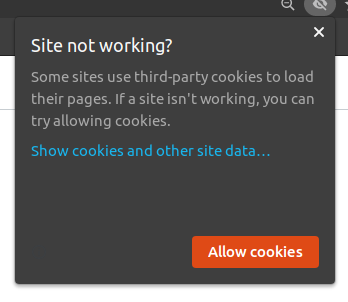
Enable Cookies:
To access Loree inside Canvas LMS in the particular browser we have to allow the browser cookies to launch Loree LTI, without allowing the cookies Loree can’t be launched.
Loree Dashboard Access
Here we go for the Role configuration to access Loree- Dashboard inside the tool. In order to get the Loree Dashboard, you must be enrolled as a “Loree-Admin“ role from the root account level.
Below are the steps to create the Loree-Admin role and assign people on this role to get Loree Dashboard access.
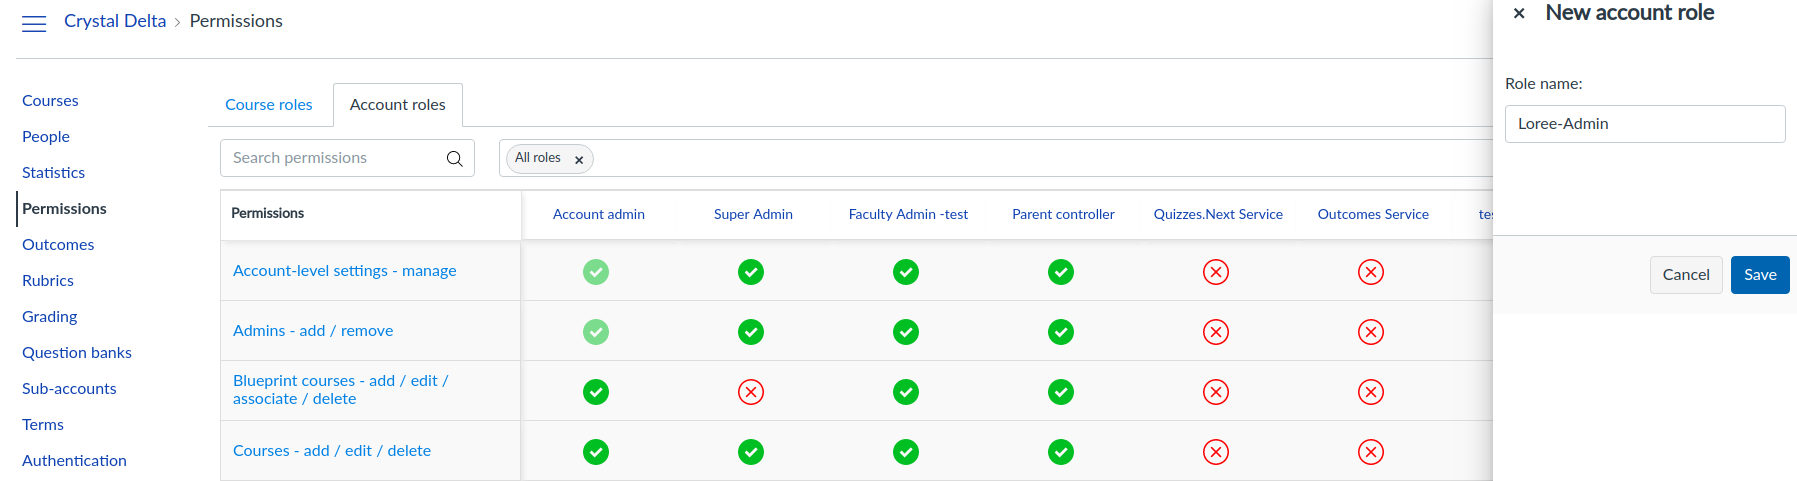
Step 20: As an Account Admin of your instructure, you have to navigate to Admin → Account name(root account) → Permissions → Account roles tab
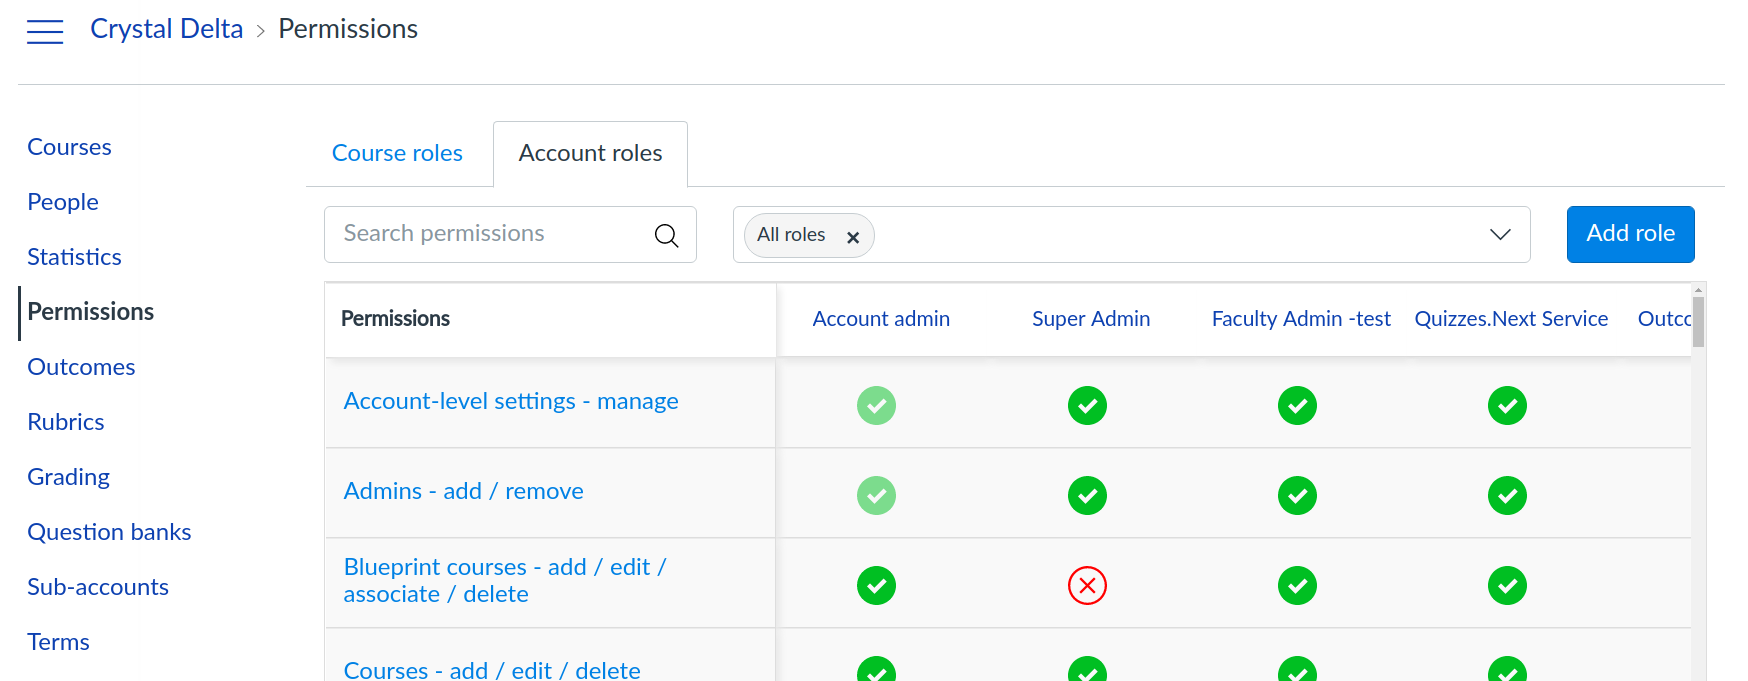
Step 21: Click on the “Add Role“ button under the Account role section
Step 22: Provide the role name as “Loree-Admin“ and save it. (Role name should not mismatch from the given)
Note: Please no spaces in between or any other modification in creating a new role, create exactly as 'Loree-Admin' to get the Loree admin dashboard set up in Loree.
Step 23: Enable all the permissions for the newly created role. This will allow Loree-Admin users to access courses and the Loree tool.
Step 24: Finally, as an Account Admin you have to assign people to the newly created role for allowing them to access Loree and Dashboard.
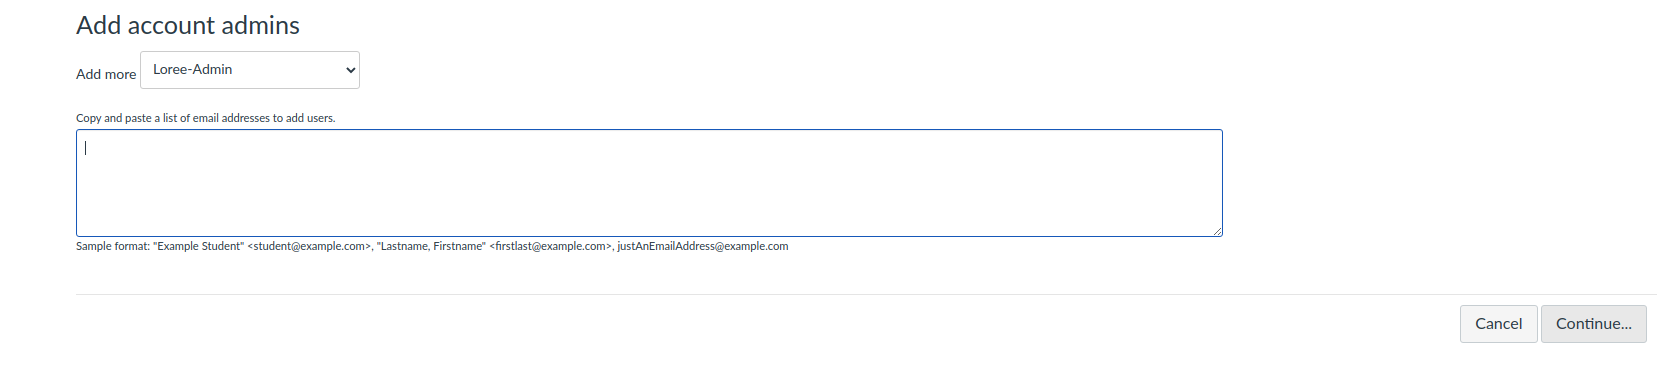
Step 25: Navigate to Admin → Account name(root account) → Settings → Admins. At the bottom, you will find out “+ Account admins button”.
Step 26: Select Loree-Admin from the drop-down and add the list of people who needs admin access to control Loree features (you can also add some later based on the need) and click Continue and Add user.
Step 27: The people who added as Loree-Admin role will get the Admin button in Loree tool right corner

Note: Only the root account Loree-Admin can see the admin button. Others will not get access.
CSS and JS for Canvas Themes
Custom CSS:
https://s3.console.aws.amazon.com/s3/object/loree-files?region=.s3.ap-southeast-2&prefix=.amazonaws.com/Loree-refined.css
Custom JS:
https://loree-files.s3-ap-southeast-2.amazonaws.com/Loree-2.0.js
Restrict Students to use Loree
Once the Loree installation is done, the Loree team will restrict the usage of the Loree tool from Students with the ‘Access token’ provided by Canvas based on the organization level. This will be done with the backend Canvas API,
| Code Block |
|---|
https://xxxxxxxx.instructure.com/api/v1/accounts/x/external_tools/xxxx?course_navigation[visibility]=admins |
Thank you for your patience![]()